
The Singer 500a manual provides essential guidance for operating and maintaining this versatile sewing machine, highlighting its key features like the Slant-O-Matic design and automatic stitch options.
1.1 Overview of the Singer 500a Sewing Machine
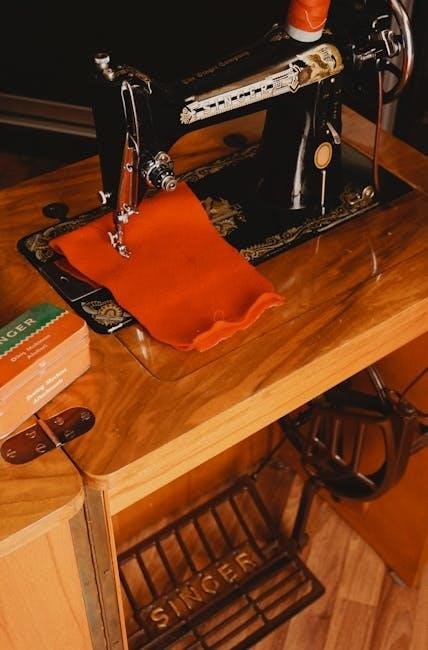
The Singer 500a sewing machine is a versatile and durable model designed for both beginners and experienced sewists. Known for its Slant-O-Matic design, it offers improved visibility and ease of use. This machine features automatic stitch options, a stitch selector dial, and compatibility with various attachments for different sewing tasks. Its robust construction ensures long-lasting performance, making it suitable for heavy-duty projects. The Singer 500a is often praised for its user-friendly interface and ability to handle multiple fabrics. With its advanced features and reliable operation, it remains a popular choice for home and small-scale commercial sewing. The manual provides detailed guidance to unlock its full potential.
1.2 Importance of the Manual for Operation and Maintenance
The Singer 500a manual is crucial for understanding the machine’s operation, maintenance, and troubleshooting. It provides step-by-step guides for setup, threading, and using attachments, ensuring users can maximize the machine’s capabilities. Regular maintenance routines, such as cleaning and oiling, are detailed to preserve the machine’s performance and longevity. The manual also covers common issues and solutions, helping users diagnose and fix problems independently. By following the manual’s instructions, users can avoid costly repairs and ensure optimal sewing results. It serves as an essential resource for both beginners and experienced sewists, offering clear instructions to enhance their sewing experience and maintain the machine effectively.

Key Features of the Singer 500a
The Singer 500a boasts an automatic stitch feature, a stitch selector dial, and the innovative Slant-O-Matic design, enhancing sewing efficiency and versatility for various projects.
2.1 The Slant-O-Matic Design and Its Benefits
The Singer 500a features the innovative Slant-O-Matic design, which provides improved visibility and easier fabric handling. This unique design allows for a clearer view of the sewing area, reducing eye strain and enabling precise control over fabric placement. The slanted machine head also enhances ergonomics, making long sewing sessions more comfortable. Additionally, the Slant-O-Matic design contributes to smoother stitching and better fabric flow, ensuring professional-grade results for both beginners and experienced sewists. This feature underscores the machine’s reputation for versatility and user-friendly operation, making it a standout choice for a wide range of sewing projects.
2.2 Automatic Stitch Features and Capabilities
The Singer 500a boasts an impressive array of automatic stitch features, designed to cater to both practical and decorative sewing needs. With multiple built-in stitch patterns, including straight, zigzag, and decorative options, this machine offers versatility for various fabrics and projects. The automatic stitch capabilities allow for consistent stitching without manual adjustment, ensuring professional-quality results. Additionally, the machine’s automatic features simplify tasks like backstitching and tension adjustment, saving time and effort. These capabilities make the Singer 500a ideal for sewing enthusiasts of all skill levels, providing a seamless experience for crafting, repairing, or creating intricate designs. The automatic stitch system is a key highlight of this machine’s functionality.
2.3 Stitch Selector Dial and Its Functions
The Singer 500a features a convenient Stitch Selector Dial, designed to simplify stitch selection for various sewing tasks. This dial allows users to easily choose from a variety of built-in stitch patterns, ensuring the right stitch for every fabric and project. By rotating the dial, sewists can select straight stitches, zigzag stitches, or decorative patterns, each optimized for different sewing needs. The dial’s intuitive design makes it easy to navigate through stitch options, enhancing the overall sewing experience. Additionally, the dial often includes a window or markings to clearly indicate the selected stitch, providing clarity and precision. This feature is particularly useful for beginners and experienced sewists alike, making the Singer 500a a versatile and user-friendly machine for countless projects.
Parts and Accessories of the Singer 500a
The Singer 500a includes a range of essential parts and accessories, such as the Slant-O-Matic bobbin, stitch selector dial, and various presser feet, ensuring versatility for sewing projects.
3.1 Major Components of the Machine
The Singer 500a sewing machine features several major components designed for optimal performance. The Slant-O-Matic mechanism provides improved visibility and smoother fabric handling. The stitch selector dial allows easy switching between various stitch patterns, while the bobbin and its case ensure consistent thread delivery. The machine also includes a foot control for regulating sewing speed and a free-arm design for accessing hard-to-reach areas. Additional components like the tension discs and take-up lever help maintain precise stitch quality. Understanding these parts is crucial for effective operation and troubleshooting, making the Singer 500a a user-friendly and durable sewing machine for both beginners and experienced sewists.
3.2 Essential Attachments and Accessories
The Singer 500a comes with several essential attachments and accessories to enhance its functionality. These include a general-purpose foot for straight stitching, a zipper foot for sewing zippers, and a buttonhole attachment for creating precise buttonholes. Additional accessories like a quilting guide and a walking foot can be purchased separately to expand the machine’s capabilities. The machine also includes a bobbin case and extra needles, ensuring ready availability for various projects. These attachments and accessories are designed to make sewing easier and more efficient, catering to both basic and advanced sewing needs. They can be found in the machine’s original packaging or downloaded as PDF guides from Singer’s official resources online.

Operating the Singer 500a
Operating the Singer 500a involves setting up the machine, selecting stitches, threading, and using the foot control for precise sewing. Follow the manual for optimal performance.
4.1 Step-by-Step Setup Guide
Setting up the Singer 500a begins with unboxing and placing the machine on a stable surface. Attach the foot controller and ensure the machine is properly oiled. Plug in the power cord and familiarize yourself with the controls. Thread the machine according to the manual, ensuring the spool pin and tension discs are correctly aligned. Insert the bobbin into the bobbin case and draw up the bobbin thread. Test the machine by sewing a scrap fabric to ensure smooth operation. Refer to the manual for specific adjustments, such as tension settings, to optimize stitching quality. Proper setup ensures efficient and trouble-free sewing.
4.2 Selecting and Using Different Stitches
To select stitches on the Singer 500a, use the stitch selector dial located on the front of the machine. Rotate the dial to choose from various options, including straight, zigzag, and decorative stitches. Each stitch type is clearly marked, making it easy to identify the desired pattern. Once selected, ensure the appropriate presser foot is attached for optimal results. For example, use the zigzag foot for zigzag and decorative stitches. Adjust the stitch length and width using the controls on the machine to suit your fabric type. Always test the stitch on scrap fabric before sewing to ensure the settings are correct. Proper stitch selection enhances the quality and versatility of your sewing projects.
4.3 Threading and Using the Foot Control
Threading the Singer 500a is straightforward. Begin by placing the thread on the spool pin and guide it through the machine’s tension discs and take-up lever. Gently pull the thread to ensure it seats properly in the tension mechanism. Next, insert the thread into the needle from front to back. The foot control allows you to regulate the machine’s speed with a pedal, providing precise control over stitching. Press the pedal gently for slower speeds and firmly for faster operation. Always ensure the machine is threaded correctly before sewing to avoid issues. The foot control enhances your sewing experience by offering smooth, adjustable speed for various fabrics and techniques.
4.4 Winding and Inserting the Bobbin
Winding the bobbin correctly ensures smooth stitching. Place the bobbin on the winder, secure it, and attach the thread to the take-up lever. Gently pull the thread to seat it, then wind evenly. Once full, cut the thread, leaving a tail. To insert, open the bobbin compartment, place the bobbin inside, and guide the thread through the machine’s tension system. Pull gently to engage the thread. Close the compartment and test stitches to ensure proper tension. This process prevents thread issues and ensures consistent sewing quality. Proper bobbin insertion is vital for optimal performance of the Singer 500a.
Maintenance and Troubleshooting
Regular maintenance, such as cleaning and oiling, keeps the Singer 500a functioning well. Addressing common issues promptly ensures consistent sewing performance and extends the machine’s lifespan.
5.1 Cleaning and Oil Requirements
Regular cleaning and oiling are crucial for maintaining the Singer 500a’s performance. Use a soft cloth to wipe away dust and debris from the exterior and internal components. Oil the machine periodically, focusing on moving parts like the bobbin area and tension discs. Always use high-quality sewing machine oil to prevent damage. Cleaning should be done after every use to ensure smooth operation. Proper lubrication keeps the machine running quietly and efficiently, reducing wear and tear. Refer to the manual for specific oiling points and frequency recommendations to keep your Singer 500a in optimal condition. Regular maintenance ensures consistent stitching and prolongs the machine’s lifespan.
5.2 Adjusting Tension for Optimal Sewing
Proper tension adjustment is vital for achieving even stitches on the Singer 500a. Start by ensuring the top thread and bobbin tension are balanced. If stitches are uneven, gently tighten or loosen the tension discs. For the top thread, adjust the small screw on the tension assembly. For the bobbin, tweak the tiny screw on the bobbin case. Always test stitches on a scrap fabric after adjustments. Too tight a tension can cause thread breakage, while too loose may result in sloppy stitching. Refer to the manual for specific guidance on locating and adjusting these components. Proper tension ensures smooth sewing and prevents fabric puckering or uneven seams. Regular checks maintain consistent results.
5.3 Common Issues and Solutions
Common issues with the Singer 500a include thread breakage, uneven stitches, and jammed mechanisms. If thread breaks frequently, check for incorrect tension settings or dull needles. For uneven stitches, ensure the fabric is moving smoothly and the stitch length is appropriately set. If the machine jams, turn it off, remove the fabric, and gently clear any tangled threads. Regular cleaning and oiling can prevent many of these issues. Always use the correct needle type and thread weight for your fabric. Refer to the manual for troubleshooting specific error symptoms. Addressing these issues promptly ensures optimal performance and extends the machine’s lifespan. Proper care and timely solutions keep your Singer 500a running smoothly.
5.4 Dealing with Thread Breakage and Uneven Stitches
Thread breakage and uneven stitches on the Singer 500a can be frustrating but are often easily resolved. Check thread tension first, as it may be too tight or too loose. Ensure the needle is correctly sized for the fabric and thread type. Dull or bent needles can cause breakage, so replace them regularly. For uneven stitches, verify that the fabric is moving smoothly without bunching and that the stitch length is set appropriately. If issues persist, clean and oil the machine to ensure proper function. Proper thread quality and compatibility are also crucial for consistent stitching. Always refer to the manual for specific adjustments and solutions to maintain optimal sewing performance. Regular maintenance can prevent these common issues.

Downloading the Singer 500a Manual
The Singer 500a manual can be downloaded as a free PDF from Singer’s official website or sewing communities, providing detailed setup, maintenance, and troubleshooting guidance;
6.1 Where to Find the Manual Online
The Singer 500a manual is readily available online through Singer’s official website, sewing forums, and platforms like Superior Sewing Machine & Supply LLC. Free PDF downloads are accessible, ensuring users can easily locate and obtain the guide without cost. Additionally, community forums and third-party sites offer direct links to the manual, making it convenient for users to find and download. These resources provide comprehensive access to the manual, ensuring seamless operation and maintenance of the Singer 500a sewing machine.
6.2 What to Expect in the Downloaded Manual
The downloaded Singer 500a manual is a comprehensive guide that covers everything from setup to advanced features. It includes detailed instructions for operation, maintenance, and troubleshooting. Users can expect clear diagrams, step-by-step guides, and explanations of the machine’s automatic stitch capabilities. The manual also provides tips for optimal sewing performance and addresses common issues like thread breakage. Additionally, it outlines the proper use of attachments and accessories, ensuring users maximize the machine’s versatility. The document is user-friendly, with sections logically organized for easy navigation. Whether you’re a novice or experienced sewist, the manual empowers you to fully utilize the Singer 500a’s features and maintain it effectively over time.
The Singer 500a manual is a vital resource for mastering its features and troubleshooting. It ensures optimal performance and is readily available online for download today.
7.1 Recap of the Manual’s Importance
The Singer 500a manual is a crucial guide for unlocking the machine’s full potential. It provides detailed instructions for setup, maintenance, and troubleshooting, ensuring optimal performance. By following the manual, users can master the sewing machine’s advanced features, such as the Slant-O-Matic design and automatic stitches. Regular maintenance tips, like cleaning and oiling, extend the machine’s longevity. The manual also offers solutions to common issues, reducing downtime. Whether you’re a beginner or an experienced sewer, the Singer 500a manual is an indispensable resource for achieving professional results and keeping your machine in top condition. Its availability online makes it easily accessible for reference anytime.
7.2 Final Tips for Effective Use
To maximize your experience with the Singer 500a, always follow the manual’s setup and maintenance guidelines. Regularly clean and oil the machine to ensure smooth operation. Practice using different stitches on scrap fabric before starting projects. When threading, ensure the thread is properly seated in the tension discs. For troubleshooting, refer to the manual’s solutions for common issues like thread breakage or uneven stitches. Keep the bobbin wound correctly and use the appropriate foot for each task. By adhering to these tips, you’ll extend the machine’s lifespan and achieve professional-level sewing results. The Singer 500a manual remains an invaluable resource for mastering your sewing skills.